Lecture Recording Microphone Guide and Use Cases
Compare lecture recording microphone types, specs, and use cases to capture clean audio for transcripts, study tools, and AI workflows.
You're sitting in a lecture hall before the room fills. Your laptop is ready, the slides are open, and you're planning to turn the recording into searchable notes, summaries, and flashcards later. Then the professor walks away from the lectern, the HVAC system starts humming, and the built-in laptop microphone captures a mixture of echo, chair noise, and a student whispering behind you.
That recording may still be understandable to a person. Speech recognition is less forgiving. A lecture recording microphone is the first link in the chain that leads to a transcript, searchable concepts, generated questions, and study material. Choose it for the room and the speaker's movement, not because it's the newest accessory on a product page.
Table of Contents
- Why Your Lecture Recording Microphone Choice Matters
- Key Specs That Actually Affect Lecture Audio
- Comparing Microphone Types for Lectures
- Matching Microphones to Lecture Settings
- Connecting Mics to ClassLecture.ai Workflows
- Recommended Picks and Common Pitfalls
Why Your Lecture Recording Microphone Choice Matters
A microphone doesn't make a lecture recording good by making it loud. It makes the recording useful by capturing the speaker's words clearly enough for people and software to separate speech from everything around it.
That distinction matters because transcription systems work from the signal they receive. If the microphone captures projector noise, room reflections, clipped consonants, or distant speech at the same level as the lecturer, the resulting transcript can lose technical terms and short connecting words. A summary may then omit an important qualification, while an automatically generated flashcard can turn a correct statement into an inaccurate one.
Practical rule: If you can improve the speaker-to-microphone distance, do that before buying a more complicated recording system.
The University of Geneva began recording lectures in the 1970s, when those recordings were generally tape-based and limited to audio until 2004, as described in this history of lecture capture workflows. The microphone was originally used for preservation and replay. Today, it also feeds search, transcription, automated summaries, question answering, and other study workflows. The underlying requirement hasn't changed. The voice has to arrive at the recorder cleanly.
What goes wrong with a weak capture setup
A built-in laptop microphone is designed for general conversations near the computer. It isn't designed to isolate a lecturer several seats or rows away. A distant microphone hears more of the room, so the recording may contain:
- Echo and reflections: Repeated versions of syllables blur word boundaries and make terminology harder to recognize.
- Low speech level: Quiet consonants disappear beneath HVAC systems, projector fans, and movement in the room.
- Uneven volume: A lecturer sounds clear at the podium, then fades when walking toward a board or demonstration area.
- Audience contamination: Student questions, typing, and nearby conversations can become part of the main speech track.
- Clipping: Loud words become distorted when the input gain is set too high, removing information that software can't reconstruct.
The result isn't merely an unpleasant recording. It's a weaker source document. A transcript with missing phrases makes review slower. A Q&A tool has less reliable evidence to work from. Flashcards may preserve the broad topic while losing the detail that makes the material testable.
What a matched microphone delivers
A suitable lecture recording microphone gives the downstream workflow a stable, intelligible signal. It keeps the lecturer's voice present, limits unnecessary room sound, and maintains a consistent level as the speaker teaches.
That doesn't mean every lecture needs studio audio. It means the recording should be clean enough that a student can follow the lecture without mentally filtering the room. The Educational Data Mining study linked to collaborative lecture recording hardware demonstrates why the microphone belongs in the workflow decision. The tested microphone setups produced an average word error rate of 0.114, while a referenced classroom-teacher headset study reported an average of 0.44. The same study found different results between microphone types, including 0.319 for an AT-Cardioid and 0.365 for a Blue-Yeti.
Those figures aren't a universal promise for every room or speech-recognition system. They do establish the practical point: microphone choice can materially affect transcription accuracy. Treat the mic as an input device for your study system, not as a minor add-on to a camera.
Key Specs That Actually Affect Lecture Audio
Microphone specifications are useful only when you connect them to the room. A polar pattern, frequency curve, or connection type tells you how the device behaves, but placement and the signal path determine whether that behavior helps your lecture.
Polar pattern comes first
Cardioid microphones favor sound from the front and reduce sound from the rear. They're a strong choice when the mic can face a lecturer from a predictable position, such as a podium, desk, or camera-facing teaching station.
Supercardioid and shotgun microphones narrow the useful pickup area further. They can reject more sound from the sides, but they demand accurate aiming. A shotgun pointed at the chalk tray, a projected slide, or an empty section of the wall won't rescue a distant voice.
Omnidirectional microphones capture sound from around the capsule. That can work well for a discussion table or a small room where several people need equal access to the microphone. It's a poor default for a lecturer speaking across a reverberant hall because it accepts more of the room along with the voice.
The farther the microphone is from the speaker, the more important directivity becomes. A tight pattern can reduce competing sound, but it can't overcome an obstructed path, bad aim, or severe reverberation.
SNR and self-noise shape recognition
Signal-to-noise ratio, or SNR, describes how much stronger the desired speech is than the microphone's own noise floor. A higher SNR gives the recorder more usable speech before the preamp and software have to work hard.
Low-level hiss is especially damaging during quiet pauses and soft phrases. Speech recognition may treat the noise as speech-like material, or it may lose the beginning or ending of a word. A professional boundary microphone specification lists an 80 dB A-weighted SNR, alongside a 20 Hz to 20 kHz frequency response and -24 dB sensitivity, in this technical reference for speech capture. Use those figures as examples of the specifications manufacturers publish, not as a universal buying threshold.
The practical test is simpler. Record the lecturer speaking at the intended distance, then listen to a quiet pause with headphones. If hiss, HVAC noise, or room rumble is prominent, improve placement or choose a quieter signal path before relying on automated transcription.
Frequency response should serve speech
For lectures, a neutral or slightly presence-focused microphone usually beats a model designed to flatter music. Speech intelligibility depends on the midrange and upper-midrange detail that carries consonants, word endings, and distinctions between similar terms.
A heavily bass-boosted microphone can make a voice sound full while masking articulation. An aggressive treble boost can emphasize hiss, sibilance, and room reflections. Don't choose a mic because its frequency range looks impressive on a product page. Listen for clear consonants and natural vowels in the actual classroom.
Connection type determines reliability
A USB microphone is fast to deploy. It connects directly to a laptop or room computer and usually avoids the need for a separate interface. That makes it practical for online teaching, office recording, and portable setups.
An XLR microphone requires an audio interface or mixer, but it fits more naturally into installed classroom systems. It also gives an AV team more control over gain, routing, mixing, and backup sources.
3.5mm, Lightning, and USB-C microphones can be useful for phones and tablets, but compatibility varies by device and adapter. Check whether the recording application sees the external microphone, whether the device supplies the necessary power, and whether the connection remains secure during the class.
For setup decisions, this guide on reducing background noise on a microphone is useful because noise control starts before transcription. A better mic in a noisy signal chain is still a noisy recording.
Comparing Microphone Types for Lectures
The right category depends on one question: how close can the microphone stay to the speaker while the lecture is happening? Distance affects room sound, reverberation, level stability, and the amount of cleanup that transcription software must attempt.
A lapel mic stays close because the lecturer wears it. A boundary mic stays unobtrusive on a fixed surface. A shotgun reaches across space but demands accurate positioning. A USB condenser works well at a desk or podium, while a smartphone-attached mic is convenient when no other option is available.
| Mic Type | Best Distance | Off-Axis Rejection | Reverberation Handling | Setup Speed | Transcription Friendliness |
|---|---|---|---|---|---|
| Lavalier or lapel | Close to the speaker's chest | Moderate, depending on capsule and placement | Strong when worn correctly | Fast after pairing and testing | High for the lecturer, weak for room questions |
| Shotgun | Moderate to long distance with a clear line of sight | Strong when aimed accurately | Good in controlled rooms, poor when mis-aimed | Moderate | High when aimed at the mouth, inconsistent otherwise |
| USB condenser | Short distance at a desk or podium | Moderate to strong with cardioid positioning | Good in a quiet, treated room | Very fast | High for a stationary speaker |
| Boundary | Fixed table, lectern, or podium position | Broad or moderate, depending on model | Good on a suitable reflective surface | Fast for permanent placement | Good for fixed speakers and small groups |
| Smartphone-attached mic | Short to moderate distance, depending on accessory | Varies widely | Usually limited in reflective rooms | Fast | Acceptable as a backup, not a primary system |
Lavalier or lapel microphones
A wireless lavalier is my first choice when the instructor moves. It keeps the capsule near the speaker's mouth while the lecturer turns toward a whiteboard, walks between stations, or leaves the lectern. That proximity usually matters more than buying a larger microphone that stays across the room.
The weakness is coverage. A lecturer's lapel mic won't automatically capture a student's question clearly. Add a handheld audience microphone, ask students to use it, or have the instructor repeat every question into the primary mic.
Shotgun microphones
A shotgun can work in a lecture hall when it's mounted on a boom and aimed at the lecturer's mouth. It's less forgiving than many buyers expect. Small changes in aim, body position, and room reflections can change the recording substantially.
Use one when the speaker can remain in a defined area and an AV operator can verify the angle. Don't mount it casually at the rear of the room and assume its narrow pattern will eliminate distance.
USB condensers
A USB condenser is a sensible tool for online lectures, faculty offices, and podiums where the lecturer remains close. It's quick to connect and easy to monitor, but it has limited reach. Put it near the speaker, not beside the laptop fan or at the far end of a large desk.
Boundary microphones
Boundary microphones suit fixed lecture tables, podiums, and small discussion spaces. The boundary effect comes from placing the capsule flush against a large reflective surface. That creates a hemispherical pickup pattern and reduces comb-filtering, which can produce a more consistent frequency response across a wide area. This technical guidance on boundary microphones and speech recording explains why surface placement matters.
Smartphone-attached microphones
A phone accessory is better than relying on a distant phone or laptop mic, especially for a quick field recording. It remains a convenience option, not a dependable classroom infrastructure choice. Battery status, cable security, device permissions, and orientation can all undermine the capture without warning.
Matching Microphones to Lecture Settings
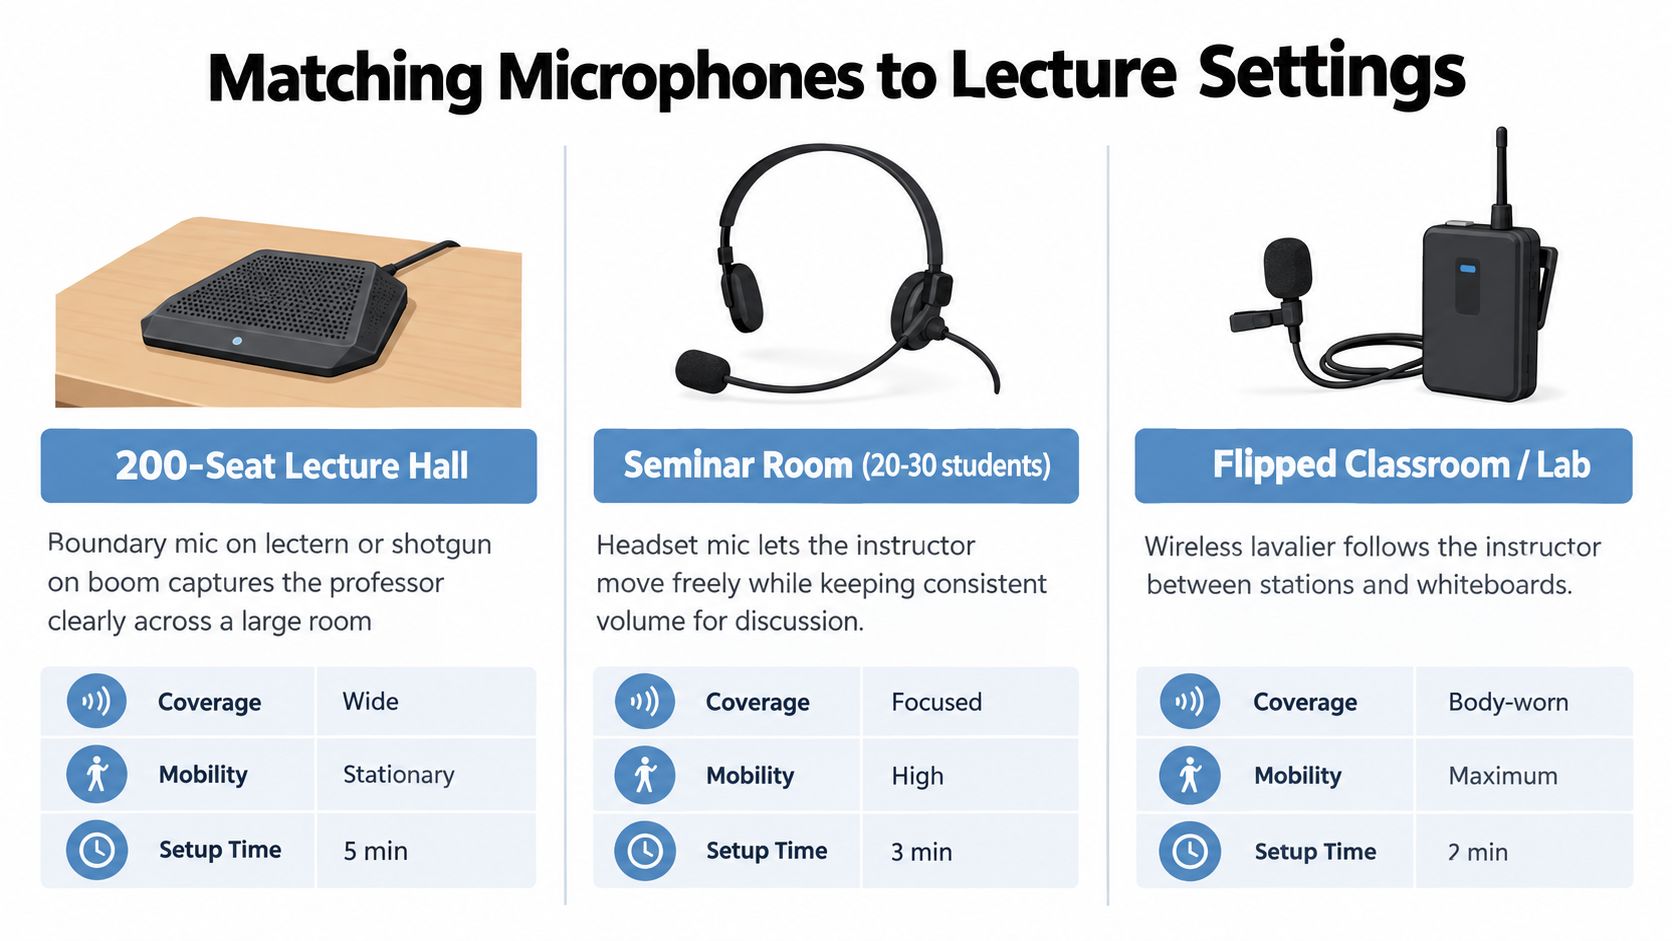
A lecturer who moves between the podium, whiteboard, and student seats needs a different recording plan from one who teaches from a fixed desk. Choose the microphone around that movement, the students who need to be heard, and the signal path already installed in the room. The right choice protects the next step too. A clean voice track gives transcription, searchable notes, Q&A, and flashcards usable speech to work with. A distant or incomplete capture produces gaps no study workflow can repair.
Large lecture halls
A fixed podium in a large hall calls for a microphone that stays aimed at the lecturer and connects reliably to the room system. A boundary microphone on the lectern is discreet and covers the speaking area across its surface. A shotgun microphone on a short boom gives more focused pickup, provided the lecturer remains within a defined presentation zone.
Neither option captures audience questions well. Students in the middle or rear need a handheld audience microphone, a ceiling-mounted array, or a clear routine in which the lecturer repeats every question. If the recording must support transcript search and question answering, audience speech belongs in the capture plan rather than being treated as optional audio.
Aim the lectern or boom microphone at the speaker's mouth, not the torso or the room. Set input gain for a clear voice with room for louder phrases. Monitor from the recorder's position, because the sound beside the podium may differ from the signal entering the recording system.
Large-scale lecture capture also depends on operational discipline. Use docked charging for lapel systems, keep backup microphones available, and assign responsibility for checking them before class. University lecture recording and streaming workflows emphasize power, correct operation, system selection, and active room microphones. Those checks determine whether a microphone remains usable across a semester.
Small seminars
A seminar room favors mobility and coverage. A wireless lavalier or neckband microphone keeps the instructor's level more consistent while they turn toward a whiteboard or move among participants. Position the capsule where clothing will not rub against it, and secure the transmitter so movement does not add cable noise.
Use a tabletop condenser or boundary microphone when the discussion itself is the material being recorded. Place it on the table's reflective surface, away from laptops, typing, and paper handling. A large table may need more than one room microphone. If only one microphone is available, ask speakers to face it rather than expecting software to reconstruct speech from the room.
The guidance on clip-on classroom microphones addresses the weakness of fixed lectern setups. A lecturer who steps away can lose level and clarity, while a wireless clip-on or neckband system keeps the voice more consistent around the room. The trade-off is maintenance. Check batteries, pairing, channel selection, and receiver routing before students arrive.
Room rule: In a discussion class, every microphone required by the recording must be active, routed, and tested. A muted audience channel creates silent questions in the transcript.
Online and hybrid classes
For an online lecture, place a side-address USB condenser close to the instructor, select a cardioid pattern, and aim the capsule toward the mouth. A shock mount can reduce desk bumps, but it cannot compensate for excessive distance. Give a guest or co-presenter a second microphone instead of asking one desk microphone to cover the whole room.
Hybrid teaching requires separate capture decisions. The online audience needs a clean instructor feed, while the in-room recording needs intelligible questions and discussion. Send the selected room microphones into the computer or capture system, then listen to the recorded mix rather than relying only on the room loudspeakers.
Use this recording class lecture workflow to check the broader process. The microphone still sets the ceiling for the result. ClassLecture.ai can organize and process a recording, but it cannot restore words that never reached the input.
Connecting Mics to ClassLecture.ai Workflows
The useful way to evaluate a lecture recording microphone is to trace the signal all the way to the study output. The path begins at the capsule, continues through the cable or wireless link, enters the recorder, passes through transcription, and ends in material a student can review.
A USB condenser sends digital audio directly to a computer or compatible mobile setup. An XLR microphone sends an analog signal to an interface or mixer, where the system sets gain, routes sources, and sends the combined output to the recorder. A wireless lavalier adds another stage, the transmitter and receiver, so battery state, pairing, frequency selection, and line-of-sight reliability become part of audio quality.
Capture is the input contract
Treat the recording as a contract with the speech-to-text system. The source should contain a strong voice signal, limited background sound, and stable levels. If the lecturer's words are buried in room noise, the transcription engine has to infer missing information. It may produce a plausible phrase that sounds fluent but changes the meaning of a technical explanation.
Set the input while the lecturer speaks at normal teaching volume. Watch the meter for a healthy signal without clipping, then test a louder passage and a quiet explanation. Listen to the saved file, not just the live monitor, because routing, software gain, and automatic processing can change the result.
For analog systems, use a stable interface and avoid stacking unnecessary gain stages. For wireless systems, test the exact transmitter, receiver, cable, and recording application that will be used in class. A spare microphone is useful only if it's charged, connected, and available at the point where the primary system can fail.
Clean audio supports more than a transcript
Once the recording is captured, the transcript becomes the working source for review. A clean lecture track supports more dependable searching, timestamped references, chapter markers, extracted questions, and generated study prompts. Poor audio affects each of those outputs because they all depend on the words being recognized first.
The in-browser recorder and upload workflow can turn lecture recordings into transcripts, summaries, flashcards, study guides, and conversational questions over the learner's own materials. The platform also supports source-aware Q&A with timestamp references, so students can check an answer against the point in the recording rather than treating an AI response as an unsupported explanation. The relevant guide to transcribing a lecture shows the capture-to-transcript use case.
That workflow doesn't make microphone placement irrelevant. It makes placement more important. If a student plans to ask about a definition, compare two theories, or generate flashcards from a dense explanation, the recording must preserve the words that carry those distinctions.
Build a failure-tolerant setup
A reliable classroom rig should assume that something will go wrong during a semester. Use dual-channel recording when possible, with a close lavalier on one channel and a room or podium microphone on the other. The close mic carries the lecturer, while the second source can preserve room context or provide a fallback.
For mobile capture, start the phone or tablet recording before the lecture and synchronize it with the main recorder using a clear verbal cue or a deliberate hand clap. Check that the external microphone is selected instead of the device's built-in capsule. Confirm that the saved file contains audio before the class begins.
Run an audio diagnostic before each session. Speak from the lecturer's normal teaching position, ask someone at the back of the room to pose a question, and listen for fan noise, hum, clothing rub, dropouts, and excessive echo. A short test can expose a routing error before it becomes an entire unusable lecture.
Operational advice: Give the lecturer a one-minute pre-class checklist. Confirm the mic is powered, the receiver is connected, the input is selected, the level is healthy, and the recording contains sound.
Recommended Picks and Common Pitfalls
Buy for the dominant use case, then add a backup for the failure you're most likely to face. A faculty AV buyer should spend less time comparing cosmetic features and more time deciding whether the speaker moves, whether students ask questions, and whether the room already has a usable audio feed.
| Use Case | Recommended Mic Archetype | Why It Works | Pitfall to Avoid |
|---|---|---|---|
| Large lecture hall | Shotgun on a boom or wide-pattern boundary mic on the lectern, plus an audience mic | Keeps the lecturer intelligible from a defined presentation area and gives questions a separate capture path | Expecting the lecturer's mic to cover students across the room |
| Small seminar | Wireless lavalier system with a diversity receiver, plus a tabletop USB condenser backup | Preserves the instructor's level during movement and provides a second source for discussion | Skipping battery, pairing, and receiver checks |
| Online or hybrid teaching | Side-address USB condenser with a cardioid capsule and headphone monitoring | Delivers a close, controllable voice signal with a simple computer connection | Putting the mic beside the laptop or far across the desk |
| Fixed podium teaching | Boundary microphone or close podium microphone | Offers unobtrusive capture when the speaker stays near the lectern | Choosing broad coverage without controlling room reflections |
| Lab or mobile demonstration | Wireless lavalier connected to the recording device | Follows the instructor between stations and keeps narration present | Relying on the phone or camera microphone at a distance |
The failure modes that matter
A wireless transmitter dies mid-lecture. The transcript begins cleanly, then the lecturer disappears or becomes distant room sound. Build charging into the room routine, keep a backup source active, and verify battery status before recording.
A lavalier sits beneath a scarf, jacket, or loose fabric. The recording develops muffled consonants and intermittent rubbing. Clip the capsule where it has a clear path to the mouth, secure the cable, and ask the speaker to turn their head naturally during the test.
A shotgun points at the wrong target. The microphone may capture the chalk tray, desk surface, or side wall while the lecturer's voice becomes thin and reverberant. Aim at the speaker's mouth and test from the position where the microphone will remain during class.
Gain is set too low. Back-row questions vanish into HVAC noise, and later software has to raise both speech and noise together. Set levels using real teaching volume and test the quietest expected speaker, not only the lecturer.
The laptop fan sits next to the microphone. The transcript contains missing words during quiet passages and the recording develops a constant mechanical bed. Move the microphone away from the computer, use a separate interface when appropriate, and monitor with headphones.
The room channel is muted. Student questions are absent even though the instructor sounds clear. Make the audience channel part of the pre-class test, and decide whether students will use a handheld mic or whether the lecturer will repeat each question.
Automatic processing changes the voice. Aggressive noise suppression can remove word endings, while automatic gain can make the recording jump between quiet and loud passages. Prefer a clean, stable source and use processing conservatively.
The final recommendation is straightforward. Choose a lavalier for a moving instructor, a boundary microphone for a fixed table or lectern, a shotgun for a controlled line of sight, and a USB condenser for close online or desk recording. Add an audience microphone whenever student questions matter, because a perfect lecturer track can't supply words that were never captured.
Record your next class with the microphone placed for the speaker, then use ClassLecture.ai to turn the audio into a searchable transcript, timestamped Q&A, summaries, and study flashcards. Visit ClassLecture.ai to upload a lecture or record one in the browser and see how your capture setup supports the rest of the study workflow.
The ClassLecture.ai Team
We build ClassLecture.ai, the AI study assistant that turns your recorded lectures into transcripts, summaries, flashcards, and answers cited to the exact timestamp — so you learn faster from your own professor's words.
Keep reading
Taking Meeting Notes: A Practical Guide for 2026
Master taking meeting notes with proven methods, real-world workflows, and AI tools that turn discussions into actionable results without losing time.
ReadHow to Make Transcripts from Lectures and Meetings
Learn how to make transcripts from lectures and meetings. Covers recording, automated vs manual options, editing, timestamping, and exporting for search.
ReadHow to Study Flashcards the Smart Way
Learn how to study flashcards with spaced repetition, active recall, and better card design. A practical guide to faster, longer-lasting learning.
Read